Microsoft Word continues to be the handy ‘go to’ program for creating documents with Office 2013. Although Office 2016 is now available many features remain interchangeable with earlier versions. When writing a book, essay, or lengthy document; various formatting options are necessary. Learning to use Microsoft’s easy toolbars, shortcuts, and configurations will save users much time in the future. As these core products continue to remain commonplace in education and career-related fields, learning to use them will assist users in enhancing job performance, creating a more comfortable workflow and ensuring one works smarter not harder. Below are 5 Quick Tips to Becoming a Pro in Microsoft Word.
Tip 1: Styling & Centering
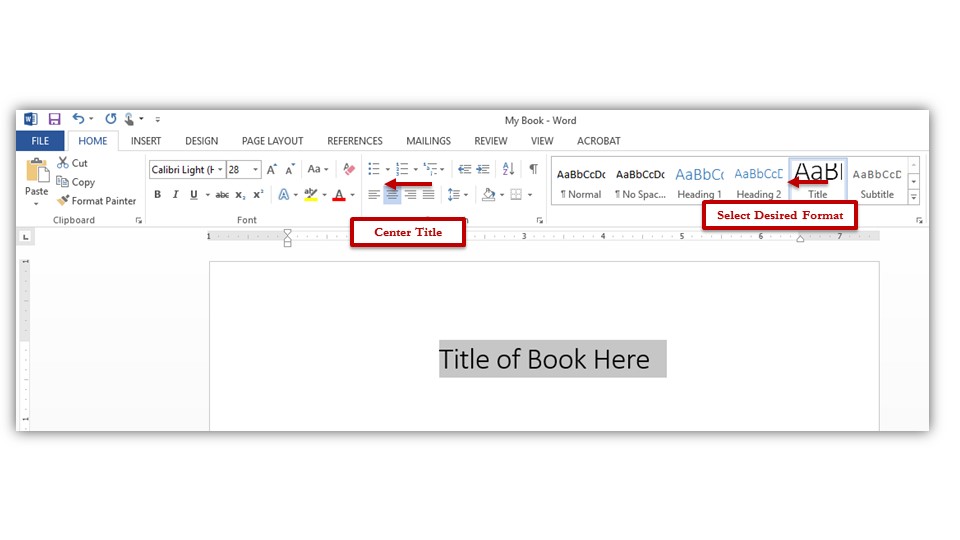
Use these quick and handy features located on the Tool bar. The Tool bar has various headings such as Home, Insert, Design, and Page Layout. This is the area where you’ll find most features that will suit your needs. After opening a new document, creating the Document heading is always a great place to start. Create your document title. Select Document heading by double-clicking on text, or highlighting words with your mouse. Then under the Home tab, locate Styles and select the style of your choice.
These preconfigured styles are great for creating headings, subtitles, and emphasis on phrases. After selecting style, move cursor to the left under the Paragraph section and center your document title as seen below.
Ctrl + E [Centers text]
Tip 2: Indention
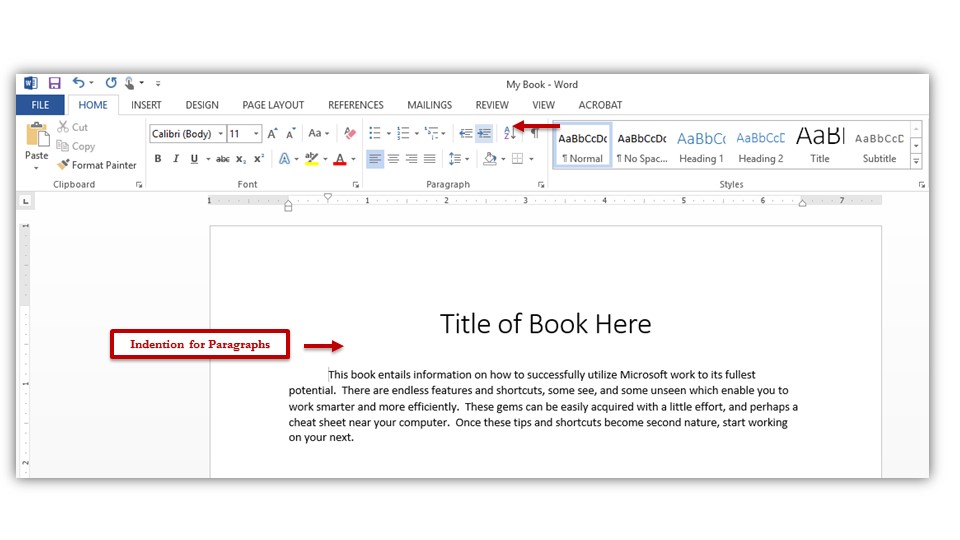
There are cases where paragraphs need to be indented. To indent a line, place cursor at the beginning of the sentence you’d like to indent, and select the indention button, located under the Paragraph section. For a quicker solution, select the beginning of a sentence and hit the Tab key on your keyboard. This is usually located to the left above or near your Caps Lock key.
Shortcut key: Tab
Tip 3: Quick Tools & Formatting
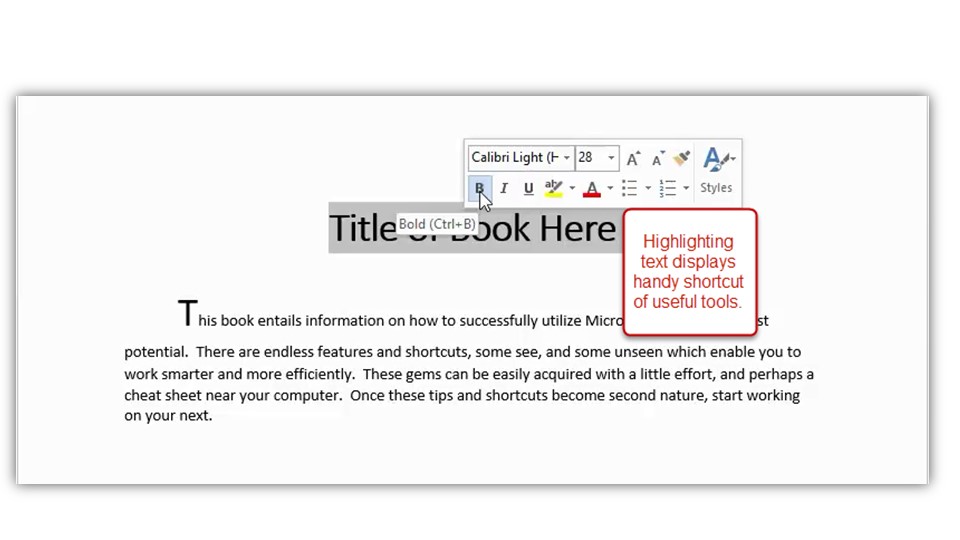
Highlight document Title and release mouse. A quick tool shortcut appears, that displays a list of commonly used formatting buttons such as Bold, Italic, Underlining and other helpful features. For this example we’ll select the Bold B, which will bold our document Title.
If we hover over the bold B with our mouse, and do not click, the shortcut to this feature appears. Ctrl + B bolds text in numerous programs such as Power Point, Photoshop, and other common software programs.
Shortcut Keys
Ctrl + B [Bolds text]
Ctrl + I [Italicizes text]
Ctrl + U [Underlines text]
Tip 4: Increasing and Decreasing Font Size
Located in the Font section of our toolbar, next to the number size for fonts, is a button with a Large A, and a Small A. These two buttons allow you to increase and decrease font size with a breeze.
Shortcut:
Ctrl + > [increases font]
Ctrl + < [decreases font]
Tip 5: Find feature, Locate Words within Document
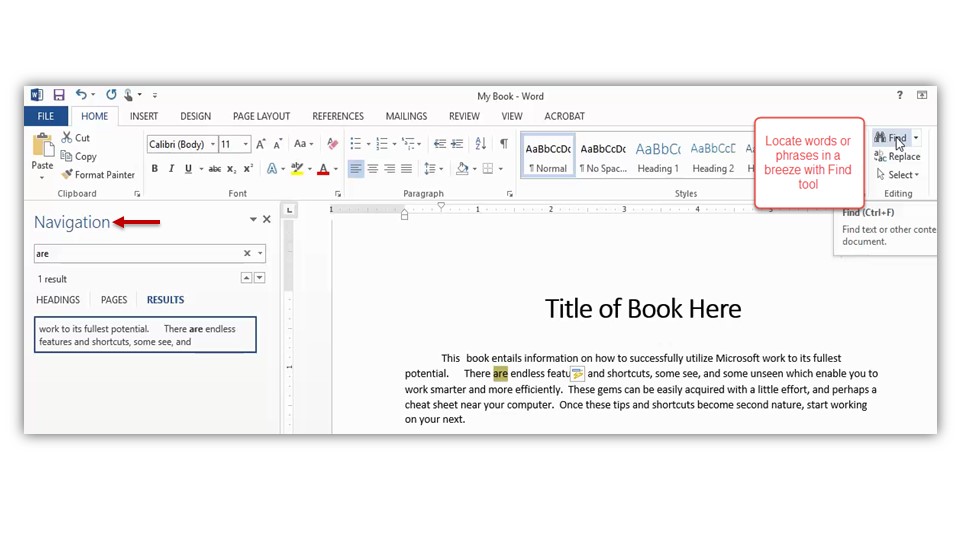
At the top right hand of your screen, is a section labeled Editing. You’ll see a set of binoculars, select the icon. This brings up the navigation menu as seen in the figure below. Type the word or phrase you wish to search for and press Enter. The desired word(s) or phrase(s) matching your request will appear below the navigation pane, and also within your document and will be highlighted in yellow.
Shortcut:
Ctrl + f [find word, phrases, or numbers]
Get To Work in Microsoft Word
Now that we’ve covered a few basic but effective tips to assist you with Becoming a Pro in Microsoft Word and you’re ready to get to work. I’ve found it useful to place a sticky note on my monitor when finding handy shortcuts that will help me day-to-day. After a week or two, I’m able to commit them to my memory and integrate them with work activities as well as pass them along to others. If these tips don’t suite your particular needs in Microsoft Word, check out the extended list of handy shortcuts here.
The link lists shortcuts for Microsoft Word 2016, but these features will work for many older versions as well. Stay tuned for more handy tutorials on Microsoft Office products and other tips that will help you on your journey to publishing your book, writing research papers, and/or gaining more knowledge pertaining to the tools you use each day.


Leave A Comment